
This is a write up I made for Project Base 0.8 around the release date, however it never ended up being added to the PB website, so I decided to reformat it into a blog post here.
Background
The new Project Base started when I created the shinespark exit code years ago and offered to add it to Project Base (0.7.2 at the time). It quickly became clear that the rom being used for Project Base was disorganised, undocumented, and filled with half fixes and leftover code cluttering the potential free space. I offered to clean it up for Grime, thinking that it would be as simple as getting a list of the code currently in the rom, and then putting those together into a single assembly file, and clearing out the free space so that it would at least be organised. However, it turned out to be a much more complicated process. Much of the code in the rom was not documented anywhere, and some of what was documented was not the same as the actual rom. On top of that, many patches and changes needed to be fixed, and there were a huge number of small tweaks and changes done directly in hex, some written down, some not.
The goal was still simply clean the rom, not add or change much else. However the more I worked on organising it, and the more fixes I had to apply, the more necessary a good structure became. Somewhere down the line it became clear that there were so many patches, and so many changes, that the hack needed more than a simple .asm file containing the changes. It needed over-arching structure, and consistency.
One of the great things about Project Base has always been that it contains the finger prints of so many great hackers from the community throughout the years. Unfortunately, that also means that most of the patches were made in individual styles with little consistency between any of them. Each patch had been adjusted at the time of inclusion to use different ram addresses, new free space, and conflitcs between patches had to be dealt with one at a time whenever they showed up, treated like bugs. There was no consistency in how the code was written, which routines were shared and which were remade, and absolutely no consistency in documentation. This is what I sought to change.
Project Base, even before the additions and changes I made over time, was already filled with so many different patches and hex tweaks, that for it to be compiled as a single project, I would need to create a structure and consistent style of code writing and documentation. What this means in a practical sense, is that the Project needed it’s own ram map, naming scheme, documentation, file structure, etc.
However, as more of the game was reimplemented onto a vanilla super metroid rom and bugs were fixed, the scope increased dramatically. Project Base was already meant to be a base for other hacks to be developed with, but not everyone wants every change made to the game, making it hard to use a general base for development. This could be changed with a fully documented code base that gets compiled onto a vanilla rom. If the code base was consistent, and clear, and documented, then a hacker could start with the code base, and remove or add any patches they wanted, to make a hack that was easy to add to, but was not restricted to the undocumented and sometimes unfinished changes in the main Project Base rom.
This went hand in hand with the changing scope that simply came with new ideas and code I developed both for my own purposes as well as potentially for project base. As the scope increased, more things from Grime’s personal vision of the future of Project Base became possible. The goal was still to make the project clean and documented and compilable, but some things simply complimented each other. For example, Grime’s vision of the future Project Base included things like new subscreens and items. Until the new Project Base, those were things most hackers could not include in their hack because of the high barrier to entry. The subscreen was an especially complicated and not well documented sub system in the game, which only a handful of hackers had even edited the back end of. For Project Base to really be a base for hackers to use to create new projects with, systems like that needed to be re-engineered. And if that were going to be re-engineered, it only made sense to use it to implement some of Grime’s plans for the future Project Base.
There’s a difference however, between scrapping the vanilla code and designing an entirely new system from scratch solely for a given hack, and building a system that supports a wide variety of uses while staying relatively consistent with the original game both in terms of visuals and code.
What I set out to do, was take a system like the subscreen, remove the jank, and rebuild it into a base that could be used to make entirely new subscreens, while ensuring that it could replicate perfectly the mechanics of the original game.
The subscreen wasn’t the only system in the game to get this treatment though. Message boxes, the HUD, door transitions, and other systems were rebuilt to support both potential expansion from hackers, and the vision of a future Project Base. And of course, paramount to the entire project, is the idea that all of this code will be available publicly in the future.
Although the scope widened drastically over time to include things like the new Options screen, the modular HUD, the super fast door transitions, and more, the goal was and still is, to turn Project Base into what it was always meant to be, a base with which to create new, wonderful experiences with Super Metroid.
The Code Base
There is a ton that has been changed, but I want to go into detail on three big changes that will be relevant to hackers who want to use it as a base for their own hacks.
The Subscreen
The subscreen has been turned into something I believe is both consistent with the original game engine, as well as open to expansion for a wide variety of new uses. The way I have done that is by developing not simply a new subscreen, but a toolkit for running any number of new subscreens. The original game engine had bits and pieces that were running in a structured way, but it was still largely a hard coded, likely very quickly thrown together set of routines that individually powered the map screen and the equipment screen. It now works on 3 separate levels:
Over-arching subscreen running code, a subset of the game loop
Just like the original game, the subscreen is a subset of the main game loop, although it has been redesigned such that any subscreen can be loaded by default, not just the map screen. Similarly, the subscreen’s each load their individual tilemaps, it no longer loads both tilemaps when loading the map screen and then never changes them.
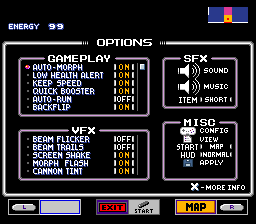
Unlike the original game, the system that runs the subscreens is designed around expansion. For example, subscreens each get their own routine for loading, running, and exiting. But the screen fading, and the code that runs those individual routines, is abstracted out of them. The game can now load any given subscreen at any time, from any other. This modularity allows for arbitrary numbers of subscreens and the connections between them are not limited to pressing L or R, but certainly support doing so. In Project Base 0.8, an example of this is the Options menu being loaded by pressing L on the map screen (or by default from pause), but the button config being loaded instead by selecting the widget in one of the option menu lists.
Individual subscreen code, which is not limited to being in the same bank as the over-arching subscreen code
This is the code that runs individual screens, like the map, options, and equipment screens. It can be unique to the subscreen, or it can be coded consistently with the others. Regardless, when this code is run the main subscreen system has already loaded up it’s given tilemap, it’s L and R options, etc.
To make the different lists and options and everything, this code calls on the underlying GUI code for subscreens. It does not have to do so however, it can be entirely unique code. For example the Map screen only does two things, 1. draw and scroll the map tilemap, 2. draw the sprites. So most of the map screen code is unique, while most of the equipment screen and options screen code uses the GUI code.
GUI toolkit code, generalized for any subscreen
This is a set of code and data structure which allows a hacker to create lists of items, options, etc. without having to know how it displays, scrolls, etc. those lists.
The code is loosely derived from the equipment screen from the original game, but abstracted such that a wide variety of use cases can be supported. It supports lists of items or options that are scrolled through, using pre drawn tilemaps for item/option names, and widgets like the reserve tanks. However, it also supports all kinds of new features on those lists. You can define the size, the sprite used as a cursor, whether it scrolls or not, etc. The equipment screen can be recreated the same way it works in the original game, but the same code that runs that is able to run the options screen, which uses much longer lists that can scroll within a smaller window, use a different method of defining on/off, and includes widgets that perform vastly different functions from the reserve tanks, like the mute toggles for sound and music, or the list options that take you to sub menus like the button config, or even spawn a message box with an option, like the Apply button does.
The HUD
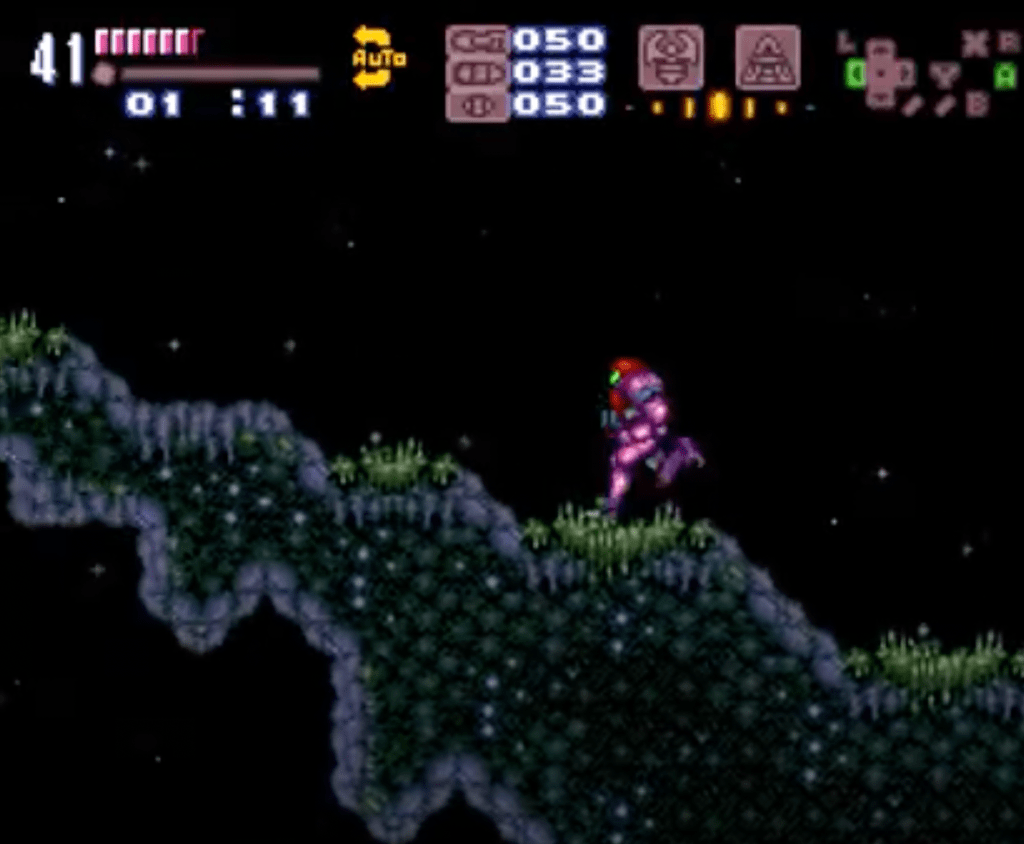
The HUD has never been a focus in previous versions of Project Base, because Grime didn’t have anything specifc to add or change about it. However, when writing out the HUD for Project Base so that it would be easier for hackers to adjust for themselves, I realized the potential for what could be done with it. Most hackers don’t change the hud, because it’s a largely hard coded system based on address mirrors and palette changing. This performs great, because most of the time only one or two of the mirrors get triggered on a given frame. However, as a result it is very limited and for most people, challenging to expand and make their own. So I decided to design a HUD that would be something every hacker could adjust in some way.
The result is a system that can be edited at different levels of complexity based on how experienced with snes asm the hacker is. At the top level, someone who just wants to move around the icons, use smaller or bigger ones, add a handful of new functions, etc. can do so without any knowledge of the code itself. Currently this is done through a text file with ASCII that gets run through a script and turned into the table of values run by the HUD, however it would be very easy to translate this into a GUI program for even easier manipulation.
At the intermediate level, a hacker with some knowledge of assembly could adjust different module object data or even add their own. For example, if there is a specific address they want to track on their new HUD (ex. number of ‘keys’ aquired), they can make a new module that tracks it by using a generic module that draws a 1/2/3/4 digit counter from a given address. They can also add static tiles to denote what the address is.
And finally at the advanced level, a hacker can add brand new functions for modules, new types of modules, or even add multiple hud’s that can be changed on thier own or triggered by some event (ex. different HUD for morphed and standing ala prime).
The big question after designing the system was performance. How can a fully modular, dynamic HUD have low enough performance over-head to avoid causing excess lag? Well, it wasn’t the easiest thing in the world, but I designed a particular system that allows for very low performance overhead, while providing the original functionality and more. It’s all about the probability of multiple types of updates needing to happen on a single frame. The system I designed will run in very good time on most frames, and very occasionally you may get a frame where everything comes together at the same time and it has to update for ex. the input display, and a health bar, and ammo, and the minimap. But those instances are exceedingly rare. The majority of the time it is slightly slower than the vanilla hud, while allowing for vastly more options and functions to run.
For Project Base specifically, there was a use for multiple HUD’s you could switch between on the fly, so I adapted it to allow for an arbitrary number of HUD’s that can be run, and even made it possible to swap out different gfx for each one individually, allowing for more interesting designs like the Prime and Retro HUD’s (Kraid was a bit of a nightmare to make work with that last part given the boss restructures vram on the fly haha).
Here’s an example of the text file that a script turns into the pointer table that gets run by the HUD in game:
Prime:
________G_____________I_________
_____1____9__C______E___3_______
______2_t____A________v_w_______
Because each module is represented by a single character, it’s pretty easy to visuale where each module gets positioned on the HUD in game, so it should be easy for most hackers to adjust for their own needs.
For an example of how wild the HUD creation can get, check out my video on a feature I didn’t end up using: https://youtu.be/_LOJE6C6ZFQ
Message Boxes
Message boxes have always been a bit of a pain to utilize by most hackers. There have been patches that expand the number of message boxes, and attempt to make it easier to write them with things like tables that let you write strings in xkas with simple replacement. However, nothing really expanded the functionality or made them significantly easier to write. This was something I wanted to do for a long time, because I felt that the way message boxes worked in the original game was quite limited (although quite clever), and most hacks did not utilize significantly different message boxes.
My goal was to make it as easy as possible to make message boxes without having to use any external program or script to have them formatted correctly. I originally designed a system that had some advantages like better formatting and some more modular functions (for ex. borders), but ultimately it was still a pain to make message boxes because at best I still needed to run a script for the message boxes to be formatted correctly while not being a pain to make.
But I didn’t think that was good enough, so I decided to write a brand new message box system that is still consistent with the original idea for how message boxes work (ie. the HDMA used to ‘open’ and ‘close’ the boxes), but would be as versatile as possible, as easy to use as possible, and as clean and documented as possible.
What I ended up with, I think will be helpful to many hackers that want to add new functionality with message boxes.
The system I designed allows for message boxes to be made using String Substitution, something anyone that programs in a modern language will be familiar with. But for those who aren’t, it boils down to being able to denote a position in a string, with a type identifier, where the system will insert something referenced after the string, usually in the order they appear in the string. A basic general example of string substitution would be something like this:
> firstString = “world”
> newString = “hello %s”, (firstString)
producing a string that says “hello world”, because the %s denotes [%] – substitution, [s] – string.
Now it doesn’t work *exactly* like this in Project Base, but it’s pretty darn close.
To explain, let’s start with a simple example:
> .morph_ball
>   dw "______#####morph#ball####_______"
In this example, we have the morph ball message box, and it is very simple. The _ means blank space, the # means solid black tile, and the letters simply represent normal letters using a table that is loaded in by xkas when compiling. There are a few different ones for different colours, easily accessable with macros.
Now for a more complex example, one that uses a substitution:
> .bombs
>   dw "___##########bomb############___"
>   dw "___##%T######################___"
>   dw "___##########################___"
>   dw "___###%T%T&#%T####%T#X%T#####___",
 .samus, .arrow, .morphball, .setitwith, .the, .button
In this example, we have two new things going on. As before, the _ is blank, the # is solid black. But now we also have %T and X (capital X), as well as a list of names after the string. To start with, the X is a special case, but it’s also quite simple. It is a substitution, but it’s one that is not denoted with the standard % followed by an identifier. Instead, it’s just an X. This is because just like the original game, you can place button identifiers in the string, which will insert the correct button for the given action, based on the game file’s button configuration. However unlike the original game, it does not need a special function in the header and a list of positions within message boxes, instead you just place the button where you want it to show up. It uses the standard layout for which action is used. So placing an X means you’re placing whatever button is used for SHOOT in the game file. If that button is Y, it will replace that character in the string with a Y letter that uses the colour of the button.
Next we have the actual substitution, %T. At this point, it should look very familiar, because it works basically identically to a modern language. You place %T anywhere you want to substitute in a (T)ilemap. The list following the string references each substitution. So in this case, the first %T the game will find is referenced with .samus, which is a pointer to a tilemap of samus (the 2×3 tile samus outline used in a couple of the original message boxes). So, when creating the tilemap for the message box, the game will remember that position and replace the tiles specified with the tilemap of samus. This means you can easily move around the tilemap in the string without breaking the alignment of the characters, making it easy to visualize and require no external program to create.
However, it gets better. There are two other types of substitutions. In total you can use %T, %F, and %O. (T)ilemap, (F)unction, and (O)ption.
– (T)ilemap: as explained above, it will simply replace a given location with a given tilemap. The tilemap has a format that is consisten across the code base (for ex. the HUD), and is somewhat consistent with other parts of the original game (it’s similar to PLM tilemap formatting)
– (F)unction: This will remember the location, and once the tilemap is created for the message box, it will run the function that is pointed to in the list after the string, with the location as an argument. This lets the function know where it is in the tilemap, at which point it can dynamically replace the tiles with anything it needs to.
– (O)ption: This is where the YES NO options from the original game live, except they are now much much more versatile. Where ever the game finds a %O, it will remember as the position of an option, and it will associate that option with a tilemap found in the pointer list after the string. Then, once the tilemap is created, it will set the first option found to be selected and deselect the others by inverting their palette. When the player moves from one option to another, the game will turn on and off the different tilemaps by adding the arrow and changing the palette.
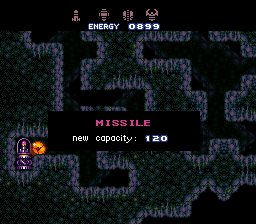
The second two are the real meat of this new system. The function allows you to give it any function you want, which means you can have it tell you new information from the same message box. This is used in Project Base 0.8 for ammo pickups to show you your new maximum of the given ammo type, with only ever using one tilemap, but it is also used to have the initial weapon message box for missiles/supers/powers/grapple/xray show you the HUD icon for the specific HUD you are using when you trigger the message box. This means it will always show you the exact icon to look for, even if the HUD you’re using is Prime for one and Retro for another (two HUD’s with completely different icons, different sizes and visuals).
The option substitution makes options finally accessable for hackers that don’t know how to or want to write entirely new routines for handling the player input selection. In the original game it was entirely hard coded, where it replaced the entire line in the tilemap with a new one that either had YES selected or No selected. This was extremely limited and specific to the save message box. Now, options can not only be placed anywhere in the message box (see: gunship message box in 0.8), but they can use whatever tilemap you give it (ex. yes, no, refill, exit, save, etc.), and will return a value starting at 0 for which option the player chose.
Here is an example of functions and of options:
>.missile_tank
>   dw "___#########missile##########___"
>   dw "___##########################___"
>   dw "___######%F##################___"
>   dw "___##%T######&#%T#%T#X%T#####___",
 Message_box_method_missile_icon, .select, .press, .the, .button

>.ship_option
>  %text_yellow()
>	dw "______###gunship#online##_______"
>   dw "______#####%T%O##########_______"
>   dw "______#######%O##########_______"
>   dw "______#######%O##########_______",
 .arrow, .option_save, .option_refill, .option_exit
The missile tank message box uses %F to display the HUD icon for the specific HUD the player is using, %T to show the different tilemaps for the small written words that say ‘press the button’ across a few tiles, and it uses X to display the button for SHOOT.
The ship option starts with a macro to change the text to yellow (%text_yellow()), followed by a string containing three options. They are each given tilemaps so they can say different things to denote their functions to the player (save, refill, exit), and it uses the arrow tilemap with %T to make it simpler for the player to see right away.
The only other thing to note about message boxes, other than them being able to different and unique borders, is the structure of the header. Here’s what the missile tank header looks like:
> dw $0005, .wide, .missile_tank ;02
Each header is in three parts. The first contains both the number of substitutions (5), and the length to stay open (which is an index so the hacker can specify exact frame counts) (0). The second points to the type of border used, in this case a simple wide border (just the horizontal length of the black tiles across the top and bottom), however it could use unique ones (like the pause menu use in Project Base 0.8) as well. And lastly, a pointer to the message box string itself.
End
I hope that gives a better idea of what this update to Project Base is and why it’s such a big deal for Project Base. It isn’t just a few new features and a settings menu, it’s a whole new base for hackers to make awesome new stuff with. And when the source code is available, I hope I’ll see people make great use of it!
